
| 일 | 월 | 화 | 수 | 목 | 금 | 토 |
|---|---|---|---|---|---|---|
| 1 | 2 | 3 | 4 | 5 | 6 | |
| 7 | 8 | 9 | 10 | 11 | 12 | 13 |
| 14 | 15 | 16 | 17 | 18 | 19 | 20 |
| 21 | 22 | 23 | 24 | 25 | 26 | 27 |
| 28 | 29 | 30 | 31 |
- android designsystem
- ㅋㅁ
- Design Pattern
- 안드로이드 디자인시스템
- 코루틴
- 팩토리 메소드
- builderPattern
- material3
- 코틀린멀티플랫폼
- factory method
- 옵저버 패턴
- PrototypePattern
- Observer Pattern
- kotlin multiplatform
- 디자인패턴
- 빌터패턴
- 디자인패턴 #
- 추상팩토리패턴
- designPattern
- compose
- Abstract Factory
- Kotlin
- 코틀린
- 함수형프로그래밍
- kmp
- 프로토타입 패턴
- Coroutines
- Functional Programming
- 추상 팩토리
- define
- Today
- Total
오늘도 더 나은 코드를 작성하였습니까?
Navigation graph design 네비 그래프 디자인 본문
Navigation graph design 네비 그래프 디자인
hik14 2021. 11. 18. 20:45navigation component 는 navi graph를 사용하여 앱의 탐색을 관리합니다.
navi graph는 사용자가 한 destination에서 다른 대destination으로 이동하기 위해 실행할 수 있는 action 또는 논리적 연결과 함께 앱의 모든 대상이 포함된 리소스 파일입니다. Android 스튜디오의 Navigation Editor를 사용하여 앱의 탐색 그래프를 관리한다.
앱의 navi graph 디자인하기 위한 권장사항 및 추천사항을 알아보기.
Top-level(최상위 수준) navi graph
앱의 최상위 navi graph는 사용자가 앱을 시작할 때 표시되는 초기 destination에서 시작해야 하며, 앱 주위를 이동할 때 표시되는 destination을 포함해야 한다.
Nested navi graph
앱 내의 로그인 흐름, 기타 하위 흐름은 일반적으로 중첩 탐색 그래프로 가장 잘 표현됩니다.
- sub 탐색 흐름을 중첩함으로써 앱 UI의 주요 흐름을 더 쉽게 이해하고 관리할 수 있습니다
- 중첩 그래프는 재사용할 수 있습니다.
- 캡슐화 수준을 제공합니다.(중첩 그래프 외부의 destination은 중첩 그래프 내의destination에 직접 액세스할 수 없습니다)
- nested graph 자체로 탐색해야 합니다. (내부 논리는 그래프의 나머지 부분에 영향을 주지 않고 변경될 수 있습니다)
최상위 navi graph 를 사용하여 앱이 최초 실행될 때만 사용자에게 title_screen 및 회원가입 화면을 표시하도록 요구한다면,
이후 사용자 정보가 저장되며 이후 앱 실행 시 match 화면으로 바로 이동해야 합니다.
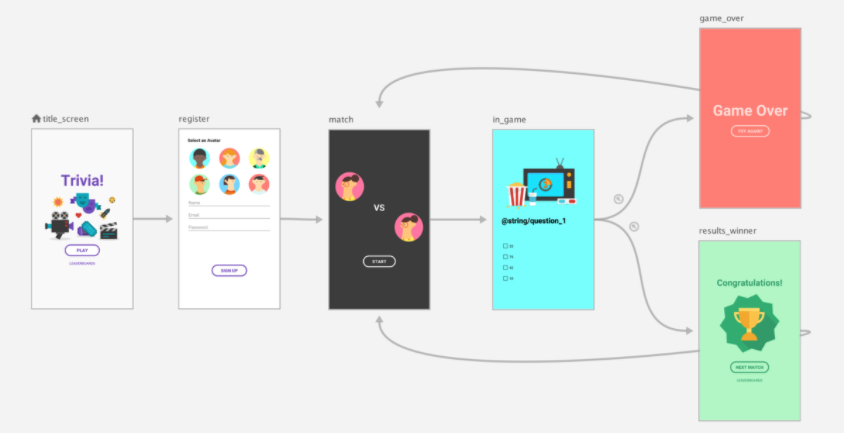
아래 같이 match destination을 최상위 탐색 그래프의 시작 대상으로 설정하고 제목 및 등록 화면을 중첩 그래프로 이동한다.
match destination이 실행되면 등록된 사용자가 있는지 확인할 수 있습니다.
1) 사용자가 등록되지 않은 경우 사용자를 등록 화면으로 이동할 수 있습니다.(조건부 탐색이 필요하다.)
2) 그래프 구조를 모듈화해서 상위 탐색 그래프의 <include> 요소를 통해 다른 그래프 내에 하나의 그래프를 포함하는 것입니다.

Library Module 간 탐색
- 앱이 navi graph 가 포함된 라이브러리 모듈에 의존하는 경우 <include> 요소를 사용하여 이러한 navi graph를 참조할 수 있다.
Global actions
2개 이상의 방법을 통해 도달할 수 있는 앱의 destination에는 해당 destination으로 이동하도록 정의된 해당 전역 작업이 있어야 합니다.
global action 을 사용하여 어디서나 대상으로 이동할 수 있습니다.
동일한 action이 results_winner(destination) 와 game_over(destination) 모두에 정의되어 있습니다.
아래 예와 같이 이러한 공통 작업을 단일 global action으로 추출하여 두 destination 모두에서 참조해야 합니다.
<?xml version="1.0" encoding="utf-8"?>
<navigation xmlns:android="http://schemas.android.com/apk/res/android"
   xmlns:app="http://schemas.android.com/apk/res-auto"
   android:id="@+id/in_game_nav_graph"
   app:startDestination="@id/in_game">

   <!-- Action 게임 탐색 그래프 이전의 destination 돌아가가는 global action -->
   <action android:id="@+id/action_pop_out_of_game"
                       app:popUpTo="@id/in_game_nav_graph"
                       app:popUpToInclusive="true" />

   <fragment
       android:id="@+id/in_game"
       android:name="com.example.android.gamemodule.InGame"
       android:label="Game">
       <action
           android:id="@+id/action_in_game_to_resultsWinner"
           app:destination="@id/results_winner" />
       <action
           android:id="@+id/action_in_game_to_gameOver"
           app:destination="@id/game_over" />
   </fragment>

   <fragment
       android:id="@+id/results_winner"
       android:name="com.example.android.gamemodule.ResultsWinner" />

   <fragment
       android:id="@+id/game_over"
       android:name="com.example.android.gamemodule.GameOver"
       android:label="fragment_game_over"
       tools:layout="@layout/fragment_game_over" />

</navigation>'Android Jetpack Architecture > Navigation' 카테고리의 다른 글
| Global Action (0) | 2021.11.19 |
|---|---|
| 중첩 네비 그래프 (Nested Navi Graph) (0) | 2021.11.19 |
| destinations 생성 (0) | 2021.11.15 |
| Navigation component 시작하기 (0) | 2021.11.12 |
| android navigation의 원칙 (0) | 2021.11.12 |

